Celebrating the 30th Anniversary of Delphi version 1.0’s Launch

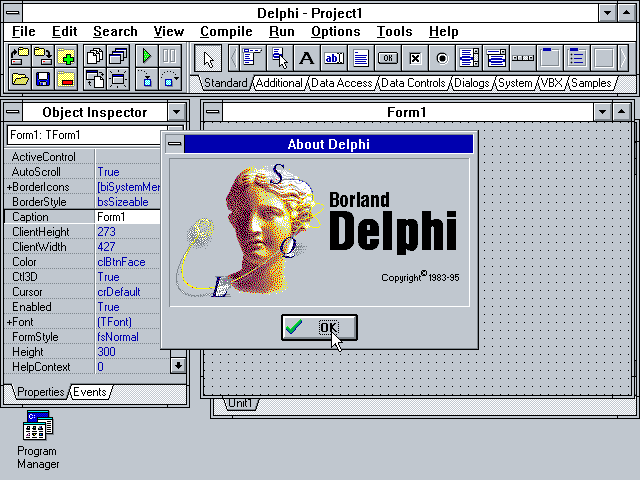
By David Intersimone “David I” – Friday, February 14, 2025

Today we celebrate the 30th anniversary of the launch of Delphi version 1.0 on Valentine’s Day, February 14, 1995, at the Software Development West Conference in San Francisco California. More that 12 years of continuous IDE, language, tools and library development led up to the launch of Delphi version 1.0.

The development of Delphi can trace some of its roots and technologies across Borland product releases including Turbo Pascal 1 (DOS and CP/M), Turbo Pascal 3 (overlays), Turbo Pascal 4 (units), Turbo Pascal 5 (integrated and standalone debugger), Turbo Pascal 5.5 (objects), Turbo Pascal for the Mac, Turbo Pascal for Windows, Borland Pascal 7 for DOS and Windows, Paradox, dBase and InterBase. While Borland Pascal 7 was available, the development team had been working for about 2 years to complete the first Delphi release (see links at the end of this article for a few of the important historical documents).

The Delphi “Sneak Peak” at the Borland Conference 1994

The first public showing of Delphi took place at the Borland International Conference (BIC) 1994 Walt Disney World Dolphin and Swan Hotels, Orlando Florida. The original language track was focused on Borland C++ 4 and also Borland Pascal. Paul Gross gave the “Product Address: Languages” in the Swan Ballroom on Monday morning from 8-9:15am. Prior to the conference a last minute decision was made to add two Delphi sessions: “Sneak Peak: Rapid Application Development in Pascal” session given by Zack Urlocker (Delphi95) and Bill Dunlap’s sneak session, “Sneak Peak: Exception Handling in Pascal”. “Even Spencer the Cat hasn’t seen this,” said senior product manager Zack Urlocker. Delphi95 will “compete with Visual Basic on the low end and PowerBuilder on the high end.”

It’s funny to look back and remember that the title of the Zack and Bill sessions were titled “Sneak Peak” – instead of “Sneak Peek” – a purposeful choice of the word “Peak” to denote the state-of-the-art technologies in Rapid Application Development (Visual Basic and PowerBuilder still did not integrate native code compilers).

There was also an NDA session for leading Paradox developer partners where Delphi95 was presented. One of the questions during the session was “is this the Paradox compiler that was rumored to be in development?” The answer was no, unless you wanted to use Delphi and the BDE to access your Paradox files.

The Delphi v1 Launch – Valentine’s Day, February 14, 1995

The Delphi launch took place at the Miller Freeman Software Development Conference West in San Francisco California, on Valentine’s Day, February 14th 1995 at 7PM just after Philippe Kahn’s keynote “The Importance of Object Computing – The Algorithmic Link”. Two editions of Delphi were announced: Delphi and Delphi Client/Server. Before the launch, we were demonstrating existing Borland language products in the Borland booth. The day after the launch we demoed Delphi to overflowing crowds of enthusiastic developers.

While we annually celebrate the launch of Delphi version 1.0 on February 14, the actual RTM (release to manufacturing) date, and the date that all of the Delphi v1 files are date stamped, was February 15, 1995. Gary Whizin, R&D manager for Delphi tells the story about the RTM date in a 10 year remembrance audio interview. Gary said that the team did sign off the Delphi 1 master on February 14, 1995 before driving to the conference for the product launch. A stop ship bug was found and the product was re-mastered and the team signed off the first version again on February 15, 1995 (the date stamp on the files).

What Made Delphi version 1 So Special

While Microsoft had Visual Basic and PowerSoft had PowerBuilder, what differentiated Delphi was the combination of the power of the Object Pascal language, a visual component-based development environment and desktop and SQL database access:

  • High speed, native code compiler
  • IDE providing visual two-way tools – form designer and source code editor
  • TObject, records, component, and owner memory management
  • Property Method Event (PME)
  • Visual Component Library (VCL)
  • Runtime Library (RTL)
  • Structured exception handling
  • Data-aware components live at design time
  • Database support via BDE and SQL Links


Running Delphi v1 on Windows 3.1 in a DOSBox on a Win10 (or 11) PC

To Get Started

If you’re unfamiliar with how to install and run Delphi v1 on Windows 3.1, watch the YouTube video, “Stu’s Game Reviews – How to Play Windows 3.1 Games in Windows 11!!! New for 2024!!!”. Sure, it’s about installing Windows 3.1 and running games, but the information and steps work for any Windows 3.1 software including Delphi v1. Hint: you don’t need to install the drivers mentioned in the video unless you also want to play games. https://www.youtube.com/watch?v=P4vtHkan5xw

The Software You Need to Run Delphi v1 on Windows 3.1

The following is a list of the required software to get Windows 3.1 and Delphi running on your Windows 10 (or 11) PC.

DOSBox-X: https://dosbox-x.com/ or DosBox v7.4.2 https://www.dosbox.com/download.php?main=1

Windows 3.1 (Retail) (3.5-1.44mb) Contains 1.44mb 3.5″ retail disk images https://winworldpc.com/download/41574932-18c3-9a11-c3a4-e284a2c3a570

Borland Delphi 1.00 (2-15-1995)(CD) ISO https://winworldpc.com/download/c2b3c3be-c38a-e280-b00b-c38711c3a5ef

Borland Delphi 1.00 (2-15-1995)(CD).7z contains the following folders:

Installing Windows 3.1 and Delphi v1

To install Windows 3.1 and Delphi v1 I used DOSBox-X because it has a feature to easily handle swapping the Windows 3.1 six floppy disk image files and because “Stu” told me to use it 🙂

Install DOSBox-X and choose a folder on your Windows 10 (or 11) PC hard drive. Select all of the default settings during the install.

To install Windows 3.1, start DOSBox-X and mount the floppy disk image files for Windows 3.1. (note: I put the Win31 floppy disk images on my hard disk in a folder named “c:\w31”. I installed Windows 3.1 in my c:\DOSBox folder). The commands I typed were:

  • mount c: c:\DOSBox
  • imgmount a: c:\w31\disk01.img c:\w31\disk02.img c:\w31\disk03.img c:\w31\disk04.img c:\w31\disk05.img c:\w31\disk06.img -t floppy
  • a:
  • setup

When Windows setup asks you to put disk 2 in drive A:, use the DOSBox-X menu “Drive” menu item, select drive A and in the popup menu select “Swap disk” (note: Guy said you might be able to use CTRL-F4). This will “put floppy disk 2 into drive A”. To complete the Windows 3.1 install, repeat this procedure for each of the remaining floppy disks. Note that DOSBox-X is in control of your mouse. When the Windows install asks for input (for example when it asks you to type in your name and company), hit CTRL-F10 to switch mouse control to the program your installing and then to get mouse control back to DOSBox-X hit CTRL-F10 again (you will hear an audible beep each time you hit CTRL-F10 if your PC’s sound is turned on).

When you choose to exit the Windows 3.1 setup program click the “Reboot” button to restart the DOS virtual machine to take you back to DOSBox-X.

To install Delphi v1 I put the CDROM install image, Delphi.iso, in my c:\installs folder. Using DOSBox-X, I typed the following commands:

  • imgmount d: C:\Installs\Delphi.iso -t cdrom
  • c:
  • cd windows
  • win

After Windows 3.1 starts, use the “File Manager” app to install Delphi.


and click on the “d” drive that contains the Delphi 1 CDROM.


Open the “INSTALL” folder and you’ll see folders containing the contents for each of the 15 floppy disk images (DISK1-DISK15) and the SETUP.EXE program.

Click on the SETUP.EXE program to install Delphi 1. Note: if you have the separate floppy disk image files (not recommended), follow the Windows 3.1 DOSBox-X “imgmount” command and floppy swap disk steps above for selecting and using all 15 of the floppy disk image files.

After Windows 3.1 and Delphi v1 were installed, the following is the c:\DOSBox folder contents:

With Windows 3.1 and Delphi v1 installed you’re now ready to experience the intoxication of using Delphi version 1.0 on your Windows PC 🙂

Running Delphi version 1.0

To run the Windows and Delphi you just installed, you can use either DOSBox-X or DOSBox.

Type the following commands:

  • mount c: c:\DOSBox
  • cd windows
  • win

Then from within Windows open the Delphi folder and click on the Delphi icon. Note: use Ctrl-F10 to capture and release the mouse for use on your PC desktop and in the DOSBox running Windows.

Check Out the Delphi version 1.0 Easter Eggs

In the Delphi v1 IDE select the Help | About menu item.

Hold down the Alt-key and type (all caps) DEVELOPERS

Hold down the Alt-key and type (all caps) AND

You’ll see a picture of Anders Hejlsberg floating in one of the lakes on the Borland campus in Scotts Valley, California. I shot a video of Anders (in Denmark Donald Duck is called “ANDERS AND”), during an all day party to celebrate his engagement, and grabbed a video frame to put in the About Box for Delphi.

Hold down the Alt-key and type (all caps) TEAM

You’ll see multiple pages of the names of the extended Delphi team that were a part of the development, launch and support of Delphi 1.0 (in alphabetical order by first name).

Here is a group photo of the extended Delphi team taken in the outdoor amphitheater on the campus.


Three Delphi adds that appeared in developer magazines during the launch year

Happy 30th Anniversary Delphi Launch Day!!!

I send big hugs and love to all of the employees who ever worked on Delphi. I send my thanks to all of the technology partners and MVPs who support Delphi. And, I send my deepest thanks to all of the customers who have ever used Delphi (many still do), attend Delphi conferences and seminars, participate in Delphi user groups, participate in online webinars, and share knowledge, source code and suggestions to help everyone (including me) become better Delphi software engineers.

Check out my YouTube video: Windows 3.1 and Delphi version 1.0 running on my Windows 10 PC

I can’t finish this Delphi anniversary story without including a special developer, author and educator in my life, my brother separated at birth, and my technology travelling companion. That very special someone is Charlie Calvert. Charlie started at Borland working in technical support. Charlie is the author of “Turbo Pascal Programming 101”. After getting to know Charlie, I knew he was a one-of-a-kind developer, author and human being. I asked Charlie to join me in Borland Developer Relations. During the development of Delphi we knew that we would need great documentation, example programs, and to rev up our global Turbo Pascal community to be ready for the launch of Delphi. Charlie used his unique talents as a developer and an author to create his “Delphi Unleashed” book and also helped the team with the documentation. Charlie and I traveled the world together to present Delphi to customers, at conferences and meet with partners. While we were both children of the 60’s wearing comfy clothes (I wear Tie-dye t-shirts almost every day), on a trip to Madrid Spain we met with the government technology team working to create Spain’s early eBanking infrastructure. Nestor Miranda, head of the Borland office in Madrid, asked us to wear suits for the meeting because we were going to meet the head of the Bank of Spain. Along with two of Charlie’s programming books here is, probably the only time, a picture of Charlie and me at our hotel before we left for the meeting.

While I don’t travel, write, present and program nearly as much as I did during my 30+ years at Borland International, Inprise, Borland Software, CodeGear and Embarcadero, I have the code, pictures, videos and great memories that keep me smiling. I still program using Delphi as a semi-retired software engineer. Programming keeps me young, happy and alive!

Additional Information (with links)

Why the Name “Delphi”? By Danny Thorpe https://web.archive.org/web/20100411053213/https://edn.embarcadero.com/article/20396

Interview with Anders Hejlsberg, Chief Architect of Delphi conducted by .EXE Magazine editor Will Watts from 1995 https://web.archive.org/web/20200213131815/https://www.theopenforce.com/2020/02/anders-hejlsberg-delphi-1995.html

Delphi 1.0 Reviewers Guide http://web.archive.org/web/19961221161914/http://www.borland.com/delphi/delphi1.0/guide/8.1.1.html

Delphi Product Definition 3rd Draft (incomplete) May 13, 1993 by Zack Urlocker https://web.archive.org/web/20210928095512/https://edn.embarcadero.com/article/32971

Visual Component Library First Draft – May 24, 1993 https://web.archive.org/web/20090309083617/http://edn.embarcadero.com/article/32975

Delphi 1.0 launch demos source code, launch script – provided by Anders Hejlsberg https://web.archive.org/web/20210513011702/https://edn.embarcadero.com/article/32977

Delphi 1.0 Quick Info Guide and Features for Delphi and Delphi Client/Server editions https://web.archive.org/web/20010618130820/http://www.borland.com/delphi/del1/quinfo.html

Delphi 1.0 Fact Sheet https://web.archive.org/web/20010525055617/http://www.borland.com/delphi/del1/dpfctsht.html

Delphi 1.0 Client/Server for Windows 3.X Quick Info Guide https://web.archive.org/web/20010525055623/http://www.borland.com/delphi/del1/csqinfo.html

50 Years of Pascal and Delphi by Marco Cantu https://blogs.embarcadero.com/50-years-of-pascal-and-delphi-is-in-power/

Delphi Wikipedia https://en.wikipedia.org/wiki/Delphi_(software)

Delphi Wiki (Fandom) https://delphi.fandom.com/wiki/Delphi_Wiki

Brian Long’s Delphi & RAD Studio Easter Eggs http://blong.com/Undocumented/EasterEggs.htm#Delphi

What’s New in Delphi (and RAD Studio) version links and (release dates):

Windows Printing with C++Builder using VCL and FMX

Do you need to add printer support to your C++ applications using the Visual Component Library (VCL) or FireMonkey (FMX) GUI ? In this blog post I’ll show you how to build Windows applications that support printing image bitmaps using the VCL and FMX frameworks. One of my favorite C++Builder RTL features is that both frameworks provide similar printer components and ways of programming with only a few subtle differences.

Build VCL and FMX Application Projects

Use the “File | New | Windows VCL Application – C++Builder” menu item and create a starting C++ VCL application. Save the product to a folder.

File | New | Windows VCL Application – C++Builder

Next, in the Project Window, right mouse click on the ProjectGroup node and select the “Add New Project…” menu item.

Add New Project to the Project Group

In the popup dialog choose to create a Multi-Device Application.

Add New Multi-Device Application

Click the OK button and on the next screen choose to create a “Blank Application”.

Multi-Device Project templates list – choose Blank Application

Use the File | Save All menu item (or type Shift+Ctrl+S) to save both starting projects and the project group to a folder.

Project Group with VCL and FMX Starting Projects

Each of the VCL and FMX projects have a main form (.dfm and .fmx extensions respectively). While most of the IDE will look the same, if you select each form’s unit you will see different looks for each of their form designers.

VCL Form Designer
FMX Form Designer

There are many videos, articles and help files that describe the details of each designer (check out links in the reference section below). For now, let’s dig into the VCL and FMX printer examples I’ve created.

A Simple UI for each Printer Test Project

On each of the VCL and FMX main forms you’ll see the following components.

VCL form’s components in the Structure Window
FMX form’s components in the Structure Window

Each project’s main menu contains a File and Destination menu. The Destination menu item allows the user to choose to override the printing destination (Printer or File).

The File menu provides an OpenPictureDialog (VCL) or OpenDialog (FMX), PrintPicture dialog for choosing the printer and other printing options, PrinterSetup dialog to set additional printer setup options, Panel (aligned to the top of the form)with a label and ComboBox which will list the available printer device names, and an Image component (aligned to the client area) to contain the picture bitmap.

The VCL and FMX forms look like the following.

VCL app form with components
FMX app form with components

Right mouse click on the form and choose “View as Text” from the popup menu. Now you can see all of the form and component properties and sub-properties that have been set from their default values. You can also make changes in this text form mode but be careful to not make any errors.

To switch back to the form mode click the right mouse button (or hit Alt-F12) and choose “View as Form” from the popup menu.

VCLPrintUnit.dfm (View as Text)

object MainVCLForm: TMainVCLForm
  Left = 0
  Top = 0
  Caption = 'Printer Test (C++, VCL)'
  ClientHeight = 473
  ClientWidth = 667
  Color = clBtnFace
  Font.Charset = DEFAULT_CHARSET
  Font.Color = clWindowText
  Font.Height = -11
  Font.Name = 'Tahoma'
  Font.Style = []
  Menu = MainMenu1
  OldCreateOrder = False
  OnShow = FormShow
  PixelsPerInch = 96
  TextHeight = 13
  object Image1: TImage
    Left = 0
    Top = 41
    Width = 667
    Height = 432
    Align = alClient
    Proportional = True
    ExplicitLeft = 104
    ExplicitTop = 102
    ExplicitWidth = 424
    ExplicitHeight = 317
  end
  object Panel1: TPanel
    Left = 0
    Top = 0
    Width = 667
    Height = 41
    Align = alTop
    TabOrder = 0
    object Label1: TLabel
      Left = 10
      Top = 12
      Width = 41
      Height = 13
      Caption = 'Printers:'
    end
    object PrintersComboBox: TComboBox
      Left = 57
      Top = 9
      Width = 250
      Height = 21
      TabOrder = 0
      Text = 'PrintersComboBox'
    end
  end
  object PrintDialog1: TPrintDialog
    Options = [poPrintToFile]
    Left = 176
    Top = 56
  end
  object PrinterSetupDialog1: TPrinterSetupDialog
    Left = 304
    Top = 64
  end
  object OpenPictureDialog1: TOpenPictureDialog
    DefaultExt = 'bmp'
    InitialDir = 'c:\temp'
    Left = 56
    Top = 56
  end
  object MainMenu1: TMainMenu
    Left = 424
    Top = 64
    object File1: TMenuItem
      Caption = 'File'
      object File2: TMenuItem
        Caption = 'Open Picture'
        OnClick = File2Click
      end
      object PrintPicture1: TMenuItem
        Caption = 'Print Picture'
        Enabled = False
        OnClick = PrintPicture1Click
      end
      object PrinterSetup1: TMenuItem
        Caption = 'Printer Setup'
        Enabled = False
        OnClick = PrinterSetup1Click
      end
      object PrintPicture2: TMenuItem
        Caption = 'Exit'
        OnClick = PrintPicture2Click
      end
    end
    object Destination1: TMenuItem
      Caption = 'Destination'
      object PrintToPrinterDestinationMenuItem: TMenuItem
        Caption = 'Print to Printer'
        Checked = True
        OnClick = PrintToPrinterDestinationMenuItemClick
      end
      object PrintToFileDestinationMenuItem: TMenuItem
        Caption = 'Print to File'
        OnClick = PrintToFileDestinationMenuItemClick
      end
    end
  end
end

FMXPrintUnit.fmx (View as Text)

object MainFMXForm: TMainFMXForm
  Left = 0
  Top = 0
  Caption = 'Printer Test (C++, FMX)'
  ClientHeight = 380
  ClientWidth = 640
  Position = Designed
  WindowState = wsMaximized
  FormFactor.Width = 320
  FormFactor.Height = 480
  FormFactor.Devices = [Desktop]
  OnShow = FormShow
  DesignerMasterStyle = 0
  object Image1: TImage
    MultiResBitmap = <
      item
      end>
    Align = Client
    Size.Width = 640.000000000000000000
    Size.Height = 339.000000000000000000
    Size.PlatformDefault = False
  end
  object PrintDialog1: TPrintDialog
    Options = [poPrintToFile]
    Left = 68
    Top = 40
  end
  object PrinterSetupDialog1: TPrinterSetupDialog
    Left = 190
    Top = 42
  end
  object OpenDialog1: TOpenDialog
    DefaultExt = 'bmp'
    Filter = '*.bmp'
    InitialDir = 'c:\temp'
    Left = 312
    Top = 44
  end
  object MainMenu1: TMainMenu
    Left = 418
    Top = 46
    object FileMenu: TMenuItem
      Text = 'File'
      object OpenBitmapMenuItem: TMenuItem
        Locked = True
        Text = 'Open Bitmap'
        OnClick = OpenBitmapMenuItemClick
      end
      object PrintMenuItem: TMenuItem
        Enabled = False
        Locked = True
        Text = 'Print'
        OnClick = PrintMenuItemClick
      end
      object PrinterSetupMenuItem: TMenuItem
        Enabled = False
        Locked = True
        Text = 'Printer Setup'
        OnClick = PrinterSetupMenuItemClick
      end
      object ExitMenuItem: TMenuItem
        Locked = True
        Text = 'Exit'
        OnClick = ExitMenuItemClick
      end
    end
    object DestinationMenu: TMenuItem
      Text = 'Destination'
      object PrintToPrinterDestinationMenuItem: TMenuItem
        Locked = True
        IsChecked = True
        Text = 'Print to Printer'
        OnClick = PrintToPrinterDestinationMenuItemClick
      end
      object PrintToFileDestinationMenuItem: TMenuItem
        Locked = True
        Text = 'Print to File'
        OnClick = PrintToFileDestinationMenuItemClick
      end
    end
  end
  object Panel1: TPanel
    Align = Top
    Size.Width = 640.000000000000000000
    Size.Height = 41.000000000000000000
    Size.PlatformDefault = False
    object PrintersComboBox: TComboBox
      Position.X = 72.000000000000000000
      Position.Y = 8.000000000000000000
      Size.Width = 233.000000000000000000
      Size.Height = 22.000000000000000000
      Size.PlatformDefault = False
    end
    object Label1: TLabel
      Position.X = 8.000000000000000000
      Position.Y = 9.000000000000000000
      Size.Width = 57.000000000000000000
      Size.Height = 17.000000000000000000
      Size.PlatformDefault = False
      Text = 'Printers:'
    end
  end
end

Additional comments about component properties and event handlers are included in the source code for the projects.

The Source Code

Below you will find the header files for the VCL and FMX form units. The header files will show the component declarations, event handlers and any public/private declarations.

VCLPrintUnit.h

//---------------------------------------------------------------------------

#ifndef VCLPrintUnitH
#define VCLPrintUnitH
//---------------------------------------------------------------------------
#include <System.Classes.hpp>
#include <Vcl.Controls.hpp>
#include <Vcl.StdCtrls.hpp>
#include <Vcl.Forms.hpp>
#include <Vcl.Dialogs.hpp>
#include <Vcl.ExtCtrls.hpp>
#include <Vcl.ExtDlgs.hpp>
#include <Vcl.Menus.hpp>
#include <Vcl.WinXCtrls.hpp>
//---------------------------------------------------------------------------
class TMainVCLForm : public TForm
{
__published:	// IDE-managed Components
	TPrintDialog *PrintDialog1;
	TPrinterSetupDialog *PrinterSetupDialog1;
	TImage *Image1;
	TOpenPictureDialog *OpenPictureDialog1;
	TMainMenu *MainMenu1;
	TMenuItem *File1;
	TMenuItem *File2;
	TMenuItem *PrintPicture1;
	TMenuItem *PrintPicture2;
	TMenuItem *Destination1;
	TMenuItem *PrintToPrinterDestinationMenuItem;
	TMenuItem *PrintToFileDestinationMenuItem;
	TMenuItem *PrinterSetup1;
	TPanel *Panel1;
	TLabel *Label1;
	TComboBox *PrintersComboBox;
	void __fastcall File2Click(TObject *Sender);
	void __fastcall FormShow(TObject *Sender);
	void __fastcall PrintToPrinterDestinationMenuItemClick(TObject *Sender);
	void __fastcall PrintToFileDestinationMenuItemClick(TObject *Sender);
	void __fastcall PrintPicture1Click(TObject *Sender);
	void __fastcall PrinterSetup1Click(TObject *Sender);
	void __fastcall PrintPicture2Click(TObject *Sender);
private:	// User declarations
    bool PictureLoaded;  // boolean for whether a picture is loaded or not
public:		// User declarations
	__fastcall TMainVCLForm(TComponent* Owner);
};
//---------------------------------------------------------------------------
extern PACKAGE TMainVCLForm *MainVCLForm;
//---------------------------------------------------------------------------
#endif

FMXPrintUnit.h

//---------------------------------------------------------------------------

#ifndef FMXPrintUnitH
#define FMXPrintUnitH
//---------------------------------------------------------------------------
#include <System.Classes.hpp>
#include <FMX.Controls.hpp>
#include <FMX.Forms.hpp>
#include <FMX.Controls.Presentation.hpp>
#include <FMX.StdCtrls.hpp>
#include <FMX.Types.hpp>
#include <FMX.Objects.hpp>
#include <FMX.Dialogs.hpp>
#include <FMX.Printer.hpp>
#include <FMX.Menus.hpp>
#include <FMX.ListBox.hpp>
//---------------------------------------------------------------------------
class TMainFMXForm : public TForm
{
__published:	// IDE-managed Components
	TImage *Image1;
	TPrintDialog *PrintDialog1;
	TPrinterSetupDialog *PrinterSetupDialog1;
	TOpenDialog *OpenDialog1;
	TMainMenu *MainMenu1;
	TMenuItem *FileMenu;
	TMenuItem *OpenBitmapMenuItem;
	TMenuItem *PrintMenuItem;
	TMenuItem *PrinterSetupMenuItem;
	TMenuItem *ExitMenuItem;
	TPanel *Panel1;
	TComboBox *PrintersComboBox;
	TLabel *Label1;
	TMenuItem *DestinationMenu;
	TMenuItem *PrintToPrinterDestinationMenuItem;
	TMenuItem *PrintToFileDestinationMenuItem;
	void __fastcall PrintMenuItemClick(TObject *Sender);
	void __fastcall OpenBitmapMenuItemClick(TObject *Sender);
	void __fastcall ExitMenuItemClick(TObject *Sender);
	void __fastcall PrinterSetupMenuItemClick(TObject *Sender);
	void __fastcall FormShow(TObject *Sender);
	void __fastcall PrintToPrinterDestinationMenuItemClick(TObject *Sender);
	void __fastcall PrintToFileDestinationMenuItemClick(TObject *Sender);
private:	// User declarations
	BOOL PictureLoaded;  // boolean for whether a picture is loaded or not
public:		// User declarations
	__fastcall TMainFMXForm(TComponent* Owner);
};
//---------------------------------------------------------------------------
extern PACKAGE TMainFMXForm *MainFMXForm;
//---------------------------------------------------------------------------
#endif

Below you will find the source code for the VCL and FMX form units.

VCLPrinterUnit.cpp

//---------------------------------------------------------------------------

#include <vcl.h>
#include <Vcl.Imaging.GIFImg.hpp>
#include <Vcl.Imaging.jpeg.hpp>
#include <Vcl.Imaging.pngimage.hpp>
#include <Vcl.Printers.hpp>

#pragma hdrstop

#include "VCLPrintUnit.h"
//---------------------------------------------------------------------------
#pragma package(smart_init)
#pragma resource "*.dfm"
TMainVCLForm *MainVCLForm;
//---------------------------------------------------------------------------
__fastcall TMainVCLForm::TMainVCLForm(TComponent* Owner)
	: TForm(Owner)
{
}
//---------------------------------------------------------------------------
void __fastcall TMainVCLForm::File2Click(TObject *Sender)
{
	if (OpenPictureDialog1->Execute()) {
		Image1->Picture->LoadFromFile(OpenPictureDialog1->FileName);
		PictureLoaded = true;
		PrintPicture1->Enabled = true;
        PrinterSetup1->Enabled = true;
	}
}
//---------------------------------------------------------------------------
void __fastcall TMainVCLForm::FormShow(TObject *Sender)
{

	PictureLoaded = false;
	PrintToPrinterDestinationMenuItem->Checked = true;
	PrintToFileDestinationMenuItem->Checked = false;

	// get printers list and put in combobox
	PrintersComboBox->Items = Printer()->Printers;

	// make the currently selected printer the Item in the ComboBox
	PrintersComboBox->ItemIndex = 0;
	for (int i = 0; i < Printer()->Printers->Count-1; i++) {
		if (Printer()->Printers->Strings[Printer()->PrinterIndex] == PrintersComboBox->Items->Strings[i]) {
			PrintersComboBox->ItemIndex = i;
		}
	}

}
//---------------------------------------------------------------------------
void __fastcall TMainVCLForm::PrintToPrinterDestinationMenuItemClick(TObject *Sender)
{
	// set menu item checked for print to printer
	PrintToPrinterDestinationMenuItem->Checked = true;
	PrintToFileDestinationMenuItem->Checked = false;
	// set PrintDialog PrintToFile checkbox off
	// Note: to allow user to override the menu item - make sure
	//   PrintDialog Options poPrintToFile is set to true
	//   so that the PrintToFile checkbox appears in the dialog
	PrintDialog1->PrintToFile = false;
}
//---------------------------------------------------------------------------
void __fastcall TMainVCLForm::PrintToFileDestinationMenuItemClick(TObject *Sender)
{
	// set menu item checked for print to file
	PrintToPrinterDestinationMenuItem->Checked = false;
	PrintToFileDestinationMenuItem->Checked = true;
	// set PrintDialog PrintToFile checkbox on
	// Note: to allow user to override the menu item - make sure
	//   PrintDialog Options poPrintToFile is set to true
	//   so that the PrintToFile checkbox appears in the dialog
	PrintDialog1->PrintToFile = true;
}
//---------------------------------------------------------------------------
void __fastcall TMainVCLForm::PrintPicture1Click(TObject *Sender)
{

	// check if a picture is loaded
	if (PictureLoaded) {
		if (PrintDialog1->Execute()) {

			// Call BeginDoc - to get the dimensions for selected printer
			Printer()->BeginDoc();

			try {
				// use StretchDraw to do full size bitmap printing
				// notes:
				//   printer settings can be made using the
				//     PrintDialog and PrinterSetupDialog
				//   you can also control page layout in code:
				//     Property is Orientation:
				//       poPortrait
				//       poLandscape
				Printer()->Canvas->StretchDraw(
					Rect(0, 0, Printer()->PageWidth,Printer()->PageHeight),
					Image1->Picture->Graphic);
			}
			__finally {
				// end the document and the printing will begin
				Printer()->EndDoc();
			}
		}
	}

}
//---------------------------------------------------------------------------
void __fastcall TMainVCLForm::PrinterSetup1Click(TObject *Sender)
{
	// Printer Setup
    PrinterSetupDialog1->Execute();
}
//---------------------------------------------------------------------------
void __fastcall TMainVCLForm::PrintPicture2Click(TObject *Sender)
{
    Application->Terminate();
}
//---------------------------------------------------------------------------

FMXPrinterUnit.cpp

//---------------------------------------------------------------------------

#include <fmx.h>
#include "FMX.Printer.hpp"
#include "System.SysUtils.hpp"
#pragma hdrstop

#include "FMXPrintUnit.h"
//---------------------------------------------------------------------------
#pragma package(smart_init)
#pragma resource "*.fmx"
TMainFMXForm *MainFMXForm;
//---------------------------------------------------------------------------
__fastcall TMainFMXForm::TMainFMXForm(TComponent* Owner)
	: TForm(Owner)
{
}
//---------------------------------------------------------------------------
void __fastcall TMainFMXForm::PrintMenuItemClick(TObject *Sender)
{
	TRectF SrcRect, DestRect;

	if (PrintDialog1->Execute()) {
		// Set the default DPI for the printer. The SelectDPI routine defaults
		//	 to the closest available resolution as reported by the driver.
		// Printer->ActivePrinter->SelectDPI(1200, 1200);

		// Printer->ActivePrinter->ActiveDPIIndex = 1; // you can also the DPI index

		// Set canvas filling style
		// Printer->Canvas->Fill->Color = claBlack;
		// Printer->Canvas->Fill->Kind = TBrushKind(1);

		// Start printing
		Printer::Printer()->BeginDoc();

		// Set the Source and Destination TRects

		SrcRect = TRectF(0, 0, Image1->Bitmap->Width, Image1->Bitmap->Height);
		DestRect = TRectF(0, 0, Printer::Printer()->PageWidth, Printer::Printer()->PageHeight);

		// Print the picture, on all the surface of the page and all opaque.
		Printer::Printer()->Canvas->DrawBitmap(Image1->Bitmap, SrcRect, DestRect, 1);

		// Finish the printing job
		Printer::Printer()->EndDoc();
	}

}
//---------------------------------------------------------------------------

void __fastcall TMainFMXForm::OpenBitmapMenuItemClick(TObject *Sender)
{
	// open a bitmap for printing
	if (OpenDialog1->Execute()) {
		Image1->Bitmap->LoadFromFile(OpenDialog1->FileName);
		PrintMenuItem->Enabled = true;
		PrinterSetupMenuItem->Enabled = true;
        PictureLoaded = true;
	}
}
//---------------------------------------------------------------------------

void __fastcall TMainFMXForm::ExitMenuItemClick(TObject *Sender)
{
	// exit the application
    Application->Terminate();
}
//---------------------------------------------------------------------------

void __fastcall TMainFMXForm::PrinterSetupMenuItemClick(TObject *Sender)
{
	// use the Printer Setup dialog box
	PrinterSetupDialog1->Execute();
}
//---------------------------------------------------------------------------

void __fastcall TMainFMXForm::FormShow(TObject *Sender)
{
	// on form show event handler

	PictureLoaded = false;
	PrintToPrinterDestinationMenuItem->IsChecked = true;
	PrintToFileDestinationMenuItem->IsChecked = false;

	// populate the ComboBox with the printer device names
	PrintersComboBox->ItemIndex = 0;
	for (int i = 0; i < Printer::Printer()->Count-1; i++) {
		PrintersComboBox->Items->Add(Printer::Printer()->Printers[i]->Title);
		// set the ComboBox ItemIndex to the active printer
		if (Printer::Printer()->Printers[i]->Title == Printer::Printer()->ActivePrinter->Title) {
			PrintersComboBox->ItemIndex = i;
		}
	}
}
//---------------------------------------------------------------------------

void __fastcall TMainFMXForm::PrintToPrinterDestinationMenuItemClick(TObject *Sender)
{
	// set menu item checked for print to printer
	PrintToPrinterDestinationMenuItem->IsChecked = true;
	PrintToFileDestinationMenuItem->IsChecked = false;
	// set PrintDialog PrintToFile checkbox off
	// Note: to allow user to override the menu item - make sure
	//   PrintDialog Options poPrintToFile is set to true
	//   so that the PrintToFile checkbox appears in the dialog
	PrintDialog1->PrintToFile = false;
}
//---------------------------------------------------------------------------

void __fastcall TMainFMXForm::PrintToFileDestinationMenuItemClick(TObject *Sender)
{
	// set menu item checked for print to file
	PrintToPrinterDestinationMenuItem->IsChecked = false;
	PrintToFileDestinationMenuItem->IsChecked = true;
	// set PrintDialog PrintToFile checkbox on
	// Note: to allow user to override the menu item - make sure
	//   PrintDialog Options poPrintToFile is set to true
	//   so that the PrintToFile checkbox appears in the dialog
	PrintDialog1->PrintToFile = true;
}
//---------------------------------------------------------------------------

The VCL and FMX applications in Action

VCL app in action
FMX app in action

References

VCL Printing

Printing in VCL Applications
Vcl.Printers

FMX Printing

Printing from a FireMonkey Application
FMX.Printer

YouTube Videos

Creating your First VCL Application for Windows with C++Builder
Creating Your First C++ Windows App
Why C++Builder?

Source Code

Source Code for VCL and FMX printing projects (zip file)

About C++Builder

C++Builder Product Page – Native Apps that Perform. Build Windows C++ Apps 10x Faster with Less Code

C++Builder Product Editions – C++Builder is available in four editions – Professional, Enterprise, Architect and Community (free). C++Builder is also available as part of the RAD Studio development suite.